It was a sunny Saturday afternoon, and I was hosting a backyard barbecue for all my friends. As I was prepping the grill, I remembered a trick my dad had taught me years ago – cooking a whole chicken on a can of beer. “Beer Can Chicken?” my buddy Jeff asked, a puzzled look on his face. “Trust me, it’s going to blow your mind,” I assured him.
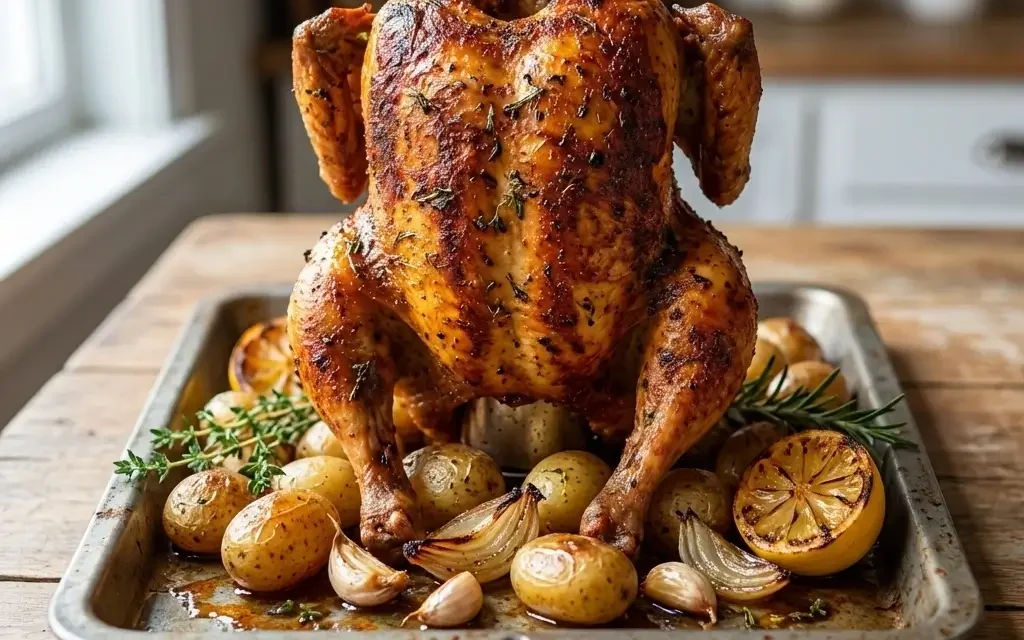
An hour later, as we gathered around the grill, the unmistakable aroma of perfectly seasoned, juicy chicken filled the air. I carefully lifted the chicken off the grill, the can of beer nestled snugly inside, and set it down on the cutting board. The skin had developed a beautiful golden-brown crisp, and the meat was tender and bursting with flavor. As I carved into that beer can chicken, I knew I had found a new summertime grilling staple.
Why This Beer Can Chicken Recipe Will Become Your Go-To
The Secret Behind Perfect Beer Can Chicken
There’s a reason why beer can chicken has become a backyard barbecue favorite – the unique cooking method creates unbelievably moist and flavorful results every single time. The secret lies in the can of beer itself. As the chicken cooks, the beer steams and infuses the meat with a subtle, delicious flavor. Plus, the can acts as an internal roasting rack, keeping the chicken elevated and allowing the air to circulate all around for even cooking.
But the real magic happens with the seasoning. This recipe calls for a simple yet robust blend of garlic powder, paprika, salt, and pepper that forms a tasty crust on the skin while the beer works its magic on the interior. The result is a chicken that’s bursting with juicy, savory goodness in every bite.
Essential Ingredients You’ll Need
To make this Beer Can Chicken recipe, you’ll need just a handful of ingredients:
- 1 (4-5 pound) whole chicken: The size of the chicken is important, as it needs to fit snugly over the beer can. Look for a bird in the 4-5 pound range for best results.
- 1 (12-ounce) can of beer: Any type of beer will work, but I prefer something light and crisp like a lager or pilsner to let the chicken’s natural flavors shine.
- 2 tablespoons olive oil: This helps the seasoning adhere to the skin and promotes even browning.
- 2 teaspoons garlic powder: Adds a savory, aromatic background note.
- 2 teaspoons paprika: Lends a beautiful color and subtle smoky flavor.
- 1 teaspoon salt: Enhances all the other flavors.
- 1/2 teaspoon black pepper: Provides a light heat and pepper kick.
Step-by-Step Beer Can Chicken Instructions
Preparing Your Beer Can Chicken
This Beer Can Chicken recipe is a breeze to make, with just 10 minutes of prep time and a 60-minute cook time, for a total time of 70 minutes. All you’ll need is a whole chicken, a 12-ounce can of beer, a few pantry spices, and a grill or oven-safe roasting pan.
1- Start by preheating your grill or oven to 375°F. If using a grill, make sure to set it up for indirect heat.
2- Open the can of beer and pour out about 1/4 cup, then set the can aside. In a small bowl, combine the olive oil, garlic powder, paprika, salt, and pepper. Rub this seasoning blend all over the outside of the chicken, making sure to get it into all the nooks and crannies.
3- Carefully lower the chicken onto the beer can, making sure the can is centered inside the cavity. The chicken should stand upright on the can.
4- Place the chicken-and-beer setup on the grill or in the oven. Cook for 60 minutes, or until the internal temperature reaches 165°F in the thickest part of the breast.
5- Remove the chicken from the grill or oven and let it rest for 10 minutes before carefully removing the can.
6- Carve the chicken and serve it hot, with the delicious pan juices drizzled over the top. Enjoy your perfectly cooked Beer Can Chicken!
Pro Tips for Success
- Use a dry rub rather than a wet marinade. The dry seasoning will create a beautiful caramelized crust on the skin.
- Make sure to center the beer can inside the chicken cavity. This will ensure even cooking and prevent the chicken from toppling over.
- Don’t be tempted to open the grill or oven too often – each time you do, you’ll lose valuable heat and cooking time.
- Let the chicken rest for at least 10 minutes before carving. This allows the juices to redistribute throughout the meat.
Serving and Storing Your Beer Can Chicken
Perfect Pairings for Beer Can Chicken
This recipe serves 4-6 people, making it a great main dish for a backyard barbecue or summer gathering. To round out the meal, I recommend serving the Beer Can Chicken with a fresh green salad, roasted potatoes, and a cold, crisp beer to complement the flavors. For a heartier side, grilled corn on the cob or a creamy coleslaw would also be delicious pairings.
Storage and Make-Ahead Tips
Leftover Beer Can Chicken can be stored in the refrigerator for up to 3-4 days. To reheat, simply place the chicken in a baking dish, cover with foil, and warm in a 350°F oven until heated through, about 20-25 minutes.
For longer-term storage, the cooked chicken can be shredded or cubed and frozen for up to 3 months. Thaw in the refrigerator overnight before reheating. You can also prepare the seasoning blend ahead of time and store it in an airtight container for up to 1 month, making day-of prep even quicker.
Variations and Dietary Adaptations for Beer Can Chicken
Creative Beer Can Chicken Variations
While the classic Beer Can Chicken is tough to beat, there are plenty of ways to put a personal spin on this recipe. Try swapping out the beer for other liquids like cider, wine, or even fruit juice. You can also experiment with different seasoning blends – maybe a Cajun-inspired rub or a zesty citrus-herb mix. For a festive twist, baste the chicken with barbecue sauce or honey during the last 15 minutes of cooking.
Making Beer Can Chicken Diet-Friendly
This recipe is naturally gluten-free, and you can make it low-carb by using a low-carb or non-alcoholic beer. For a dairy-free and vegan version, simply substitute the beer for vegetable broth and omit the olive oil, using a plant-based oil instead. No matter your dietary needs, Beer Can Chicken can be easily adapted to fit your lifestyle.
Frequently Asked Questions
Q: Can I use a different type of beer?
A: Absolutely! While I recommend a light lager or pilsner, you can experiment with all sorts of beer varieties – from hoppy IPAs to rich, malty stouts. Just keep in mind that the beer’s flavor will infuse the chicken, so choose a brew you enjoy drinking.
Q: How long does it take to cook the Beer Can Chicken?
A: This recipe has a total cook time of 70 minutes, with 10 minutes of prep and 60 minutes in the oven or on the grill. The internal temperature of the chicken should reach 165°F in the thickest part of the breast.
Q: Can I make Beer Can Chicken ahead of time?
A: Yes, you can definitely prepare this dish in advance. The cooked chicken can be stored in the refrigerator for 3-4 days or frozen for up to 3 months. Just be sure to reheat it thoroughly before serving.
Q: How many servings does this recipe make?
A: This Beer Can Chicken recipe serves 4-6 people, making it a great main course for a small gathering or perfect for leftovers throughout the week.
Q: What if the chicken starts to tip over while cooking?
A: If the chicken seems unstable on the beer can, you can try wedging some crumpled aluminum foil around the base to help it stay upright. You can also use a roasting rack or baking dish with high sides to keep the chicken stable.

Beer Can Chicken
- Total Time: 70
- Yield: 4-6 servings
Description
Discover the secret to juicy, flavorful Beer Can Chicken with this easy, effortless recipe. Perfect for busy weeknights or impressive gatherings, this 10-minute dish is a mouthwatering delight that will have your family and friends raving.
Ingredients
– 1 (4-5 pound) whole chicken
– 1 (12-ounce) can of beer
– 2 tablespoons olive oil
– 2 teaspoons garlic powder
– 2 teaspoons paprika
– 1 teaspoon salt
– 1/2 teaspoon black pepper
Instructions
1. Preheat your grill or oven to 375°F (190°C).
2. Carefully open the beer can and pour out about 1/4 of the contents.
3. Rub the chicken all over with the olive oil, then generously season with the garlic powder, paprika, salt, and black pepper.
4. Place the beer can in the center of a baking dish or rimmed baking sheet. Carefully lower the chicken over the beer can, ensuring the can is fully inserted into the cavity.
5. Grill or bake the chicken for approximately 60-75 minutes, or until the internal temperature reaches 165°F (74°C) in the thickest part of the breast.
6. Remove the chicken from the grill or oven and let it rest for 10 minutes before carefully removing the beer can.
7. Carve the chicken and serve hot, garnished with fresh herbs if desired.
Notes
For extra flavor, you can also add sliced onions, garlic cloves, or fresh herbs to the baking dish or grill grate. Be sure to use a sturdy, full-size beer can, as smaller cans may not provide enough stability.
- Prep Time: 10
- Cook Time: 60
- Category: Main Dishes
- Method: Grilling, Baking
- Cuisine: American
Conclusion
Beer Can Chicken is truly a summer grilling masterpiece. The unique cooking method infuses the meat with incredible flavor, while the dry seasoning blend creates a mouthwatering crust on the skin. This recipe is easy to prepare, yet impressive enough to serve at any backyard bash or family gathering.
Give this Beer Can Chicken a try, and I guarantee it will become your new go-to recipe for easy, delicious, and utterly unforgettable poultry. Don’t be afraid to get creative with flavors and variations – the possibilities are endless! And be sure to let me know how your Beer Can Chicken turns out in the comments below. Enjoy!

